The blue dress
Kategori: Allmänt, Historic Sew Monthly 15
or "I will never learn that there's no such thing as a 'dress' that is 'just a quick project'.
It was really a coincidence from start to finish. A some point in January, I happened to be in Stockholm, and when I happen to be in Stockholm I sometimes happen to browse for fabric. Not to buy, of course, just looking. And we all know how that usually ends, don't we? This time I browsed through the end-of-rolls pile, where I rarely find anything but that are still labelled "suit wool" (though "wool" is a kind term for the actual fabric) and suddenly stumbled on just above three meters of a dark blue fabric. Actuall, a thinly striped blue/black fabric which clearly wanted to follow me home and be made into something "just for fun". And right there and then it also wanted to be combined with some amber/brandy-coloured upholstery trim which was available too. Accidents do happen and so on.
So. There I was, with three+ metres of a fabric in a colour I didn't really have use for and 12+metres of trim (that was all that was left in the store at the time). But it was striped, after a fashion, and I've long been drooling over the Sofonisba Anguissola portrait of three siblings (and the reconstructions I've seen) and this seemed to be a great excuse to do both something vaguely striped and use a lot of trim for once.

Look at it! What's not to like? So odd. So nice. (Sofonisba Anguissola; couldn't find an exact date, but mid 1500's or thereabouts).
When looking for a pattern idea to start from, I ended ut with Eleonora de Toledo's gown from Patterns of fashion 3 (Janet Arnold). I later found out that others had come to the same conclusion, so at least if I'm wrong I'm not alone. Being me, and knowing that I wouldn't have a faithful replica no matter what, I of course couldn't resist straying from the straight and narrow and do a project somewhere in between. Originally, I intended for a pointed bodice, but with the trim layout of the levt dress above and the same sleeves with small puffs.

The first pattern in paper: two back seams with lacing and a pointed front. I was feeling brave.
I then cut the first mock-up. Everything working smoothly.
(I really need to learn that if everything is working smoothly at this stage, the Universe intends to send me a warning.)
I then cut the pieces of interlining. One layer of thick linen twill:

At this stage I hadn't decided on boning or no boning yet, but I figured I could just as well make channels when combining the two layers of interlining. Hence the red lines on the fabric.

A layer of thick wool on the other side, and then I proceeded to join the layers.
It's in this stage it's fairly obvious that I'm not enirely in my right mind. There must be a more sound and a lot quicker way to do this than to hand-sew to layers together to one layer of INTERlining, without surrendering to mild ocd. I just haven't made myself find it yet. Buuuuut nevermind that noone will ever see it now, I'll know. Or at least that's what I'm telling myself.

And time to cut the outer fabric! Again, using the mock-up pieces. Sleeves: that was the pattern I found, ok? Don't judge me, I am actually a lazy person. I save the sleeves for last, normally, but this time I had to check that they'd fit on the fabric before I cut the skirt pieces. Same procedure for the lining.
At this stage I strayed again - deciding that it would be easier to attach the trim the more rectangular the skirt was, and also I'd save myself some work, so instead of follow Arnold's pattern I cheated:
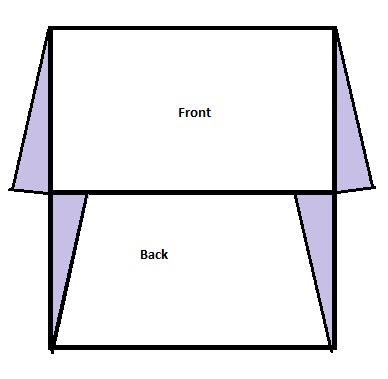
The front piece is as wide as the fabric, the purple triangles from the back was added to the front piece. It might look a bit odd, since I of course want a bit more width at the back, but remember the layout; the back piece is about half as wide as the front piece as the front piece extends all the way back under the arms and ends under the shoulderblades somewhere.
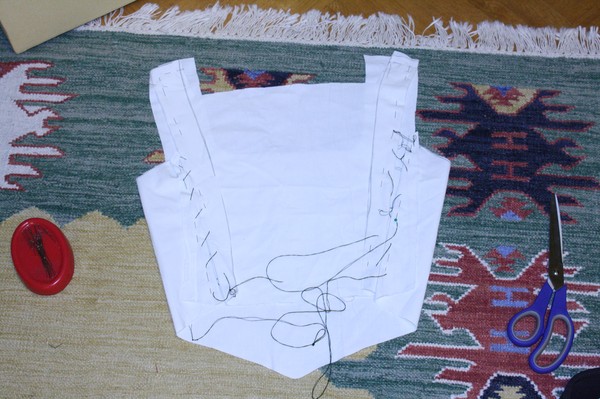
But what about the neverending project? What about me finishing this four months late? Well. This is the part where everything became very trying. First, I have an irrational fear of the pointed bodices. How on earth to attach a skirt properly? Either way it's hard. Better put it off indefinately. Second: I found out that the bodice (like always) was too long. I never learn, but at least I've learned to check. Now, I had to wait until I had a helpful friend over and pins at hand and then I had to shorten the interlining and make it work. Of course, at this stage, I had already made the holes for the lacing. Or most of them. I was just lucky I hadn't made one more on each side... This was the point where I gave up on documenting. The swearing wouldn't had shown on the pictures anyway!
In the meantime, I made myself finish the sleeves, and then actually make the skirt (after some hesitation, I decided to flatline it in undyed linen). I finished the bodice and the skirt independently and then attached the skirt with a combination of cartridge pleats (sides and back) and knife pleats (in the front).

(I honestly don't know why some pictures doesn't rotate as the are told to). As you can see I only attached the "front" of the knife pleats, because I didn't want too much fabric under the bodice.

Here the knife pleats are folded back to show the extra seam attaching the bottom of the pointed bodice to the skirt. The front pleats are left hanging loose and can be tucked away not to add bulk to the bodice.
The holes for lacing. Did I forget to add boning to the channel outside them? Yes. Does it work anyway? Actually, yes! So no plastic boning in this dress. Wooh!

In the gaps in the skirt below the lacing I faced the inside of the skirts with scraps of outer fabric.
The seams should be felled, I know, but since the fabric got all soiled in the process and I had to rewash the cut pieces I had to zig-zag, which I normally avoid. It's soooo boring and well... it's machine sewn. Anyway, this means that I can postpone the felling of seams and do it later.
The super clever thing about the Eleonora de Toledo dress: the back piece of the skirt extend beyond the actual back piece of the bodice, creating an overlap when the gown is laced. I'll never make it any other way again, it's one of those magical tricks I wish I'd come up with myself!
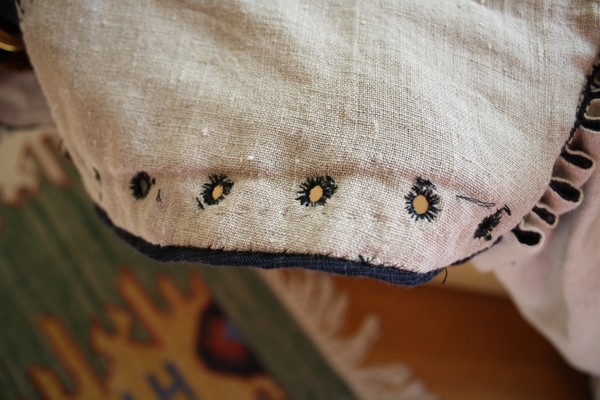
I had just enough fabric for the skirt. After the unavoidable (for me!) cutting of uneven edges, it was just about the right length without hem. Instead I bound the edge in a sturdier wool, which is a good thing anyway - it wears better and when worn out it can be replaced.

The inside of the edge. Yep, my ocd is enough to do symmetrical seams on the interlining, but not to make the binding straight. In case you wondered.

The bottom edge with trims and binding. The binding could (should) have been narrower, but awh well.
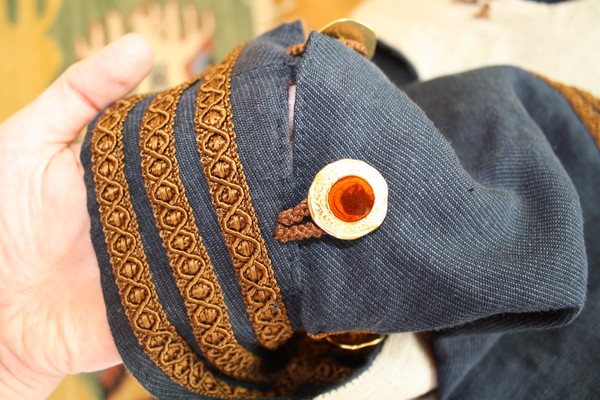
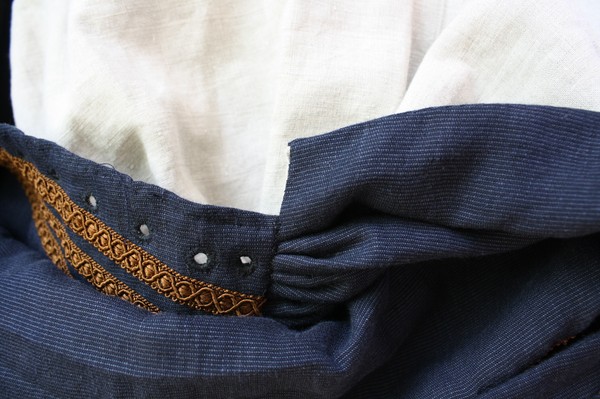
Again, inspired by Arnold, I decided to do buttons and buttonloops to attach the sleeves. No more satin ribbons untying themself! The best buttons I found was gold-coloured with a metal feel (and weight) and face tortoise shell-ishy centers and I like them.
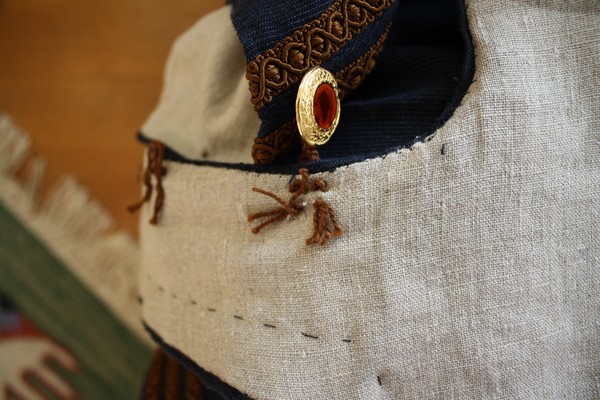
The buttonloops are fingerloop braided like the ties for the partlet from some months ago, and more tied than sewn to the dress.
And finally it was finished! I did press it during the process and afterwards, I promise, but after that I packed into a bag and went larping.

Back view: Do note that the lacing works, despite lack of boning. Am very pleased with this!
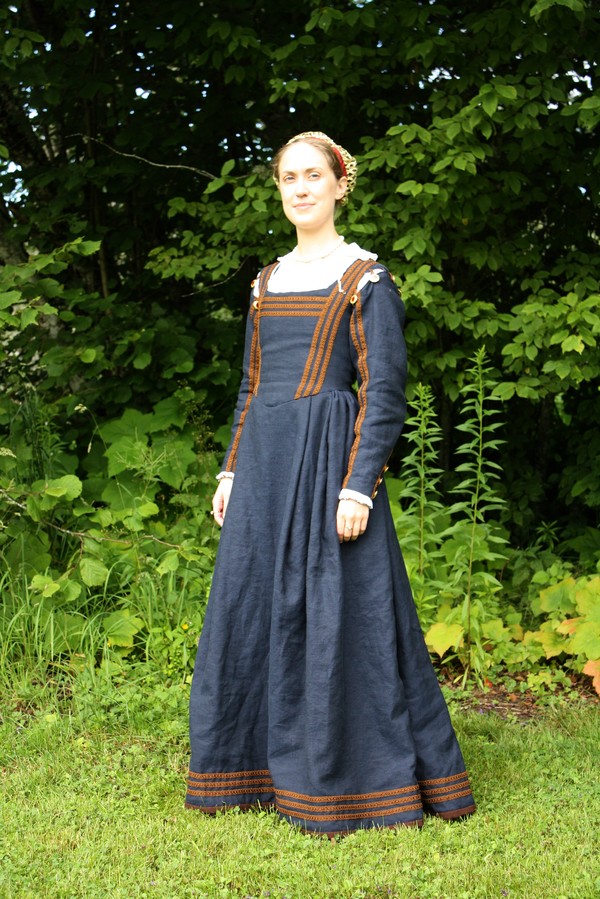
Front view. The bodice wrinkles a bit, but it's actually not the top layer acting up, it's all the layers together. I might do some more pad stitching and hope for it to improve, but this is the dress version of a hoodie and pyjama pants comfort-wise so I don't mind terribly. As you can see, the unattached pleats make the front of th skirt a bit messy, but the suitcase is the main culprit still. Overall, I'm happy - but I'm also very happy with FINALLY having completed this project. So much for "something nice and cheap to do in between projects". I never, never learn.
The Challenge: Out of your comfort zone (but originally, I intended it to be the Blue challenge!)
Fabric: "wool" for outer fabric (probably some mystery fibres as well)
Pattern: My own, Janet Arnold's "Patterns of fashion" for help and inspiraton
Year: Mid 1500s
Notions: 16 metres of trim, silk thread, polyester thread, buttons, a strip of wool for guard at the bottom
How historically accurate is it? Fairly, apart from some fabric choices I'd say it'd pass. 80%?
Hours to complete: Too, too many. I chose not to count, but I'd guess about 60. The trim alone took quite some time.
First worn: On a LARP, 22-25th of July.
Total cost: About 80 euros, half of it actually buttons and trim. The fabric wasn't too bad.

